# Get Started

Access the Pictor Network’s limitless rendering capacity to speed up your 3D rendering at a fraction of the cost with ease through just a few simple steps:

<table data-view="cards"><thead><tr><th></th><th data-hidden data-card-cover data-type="image">Cover image</th><th data-hidden data-card-target data-type="content-ref"></th></tr></thead><tbody><tr><td>                     Step 01</td><td><a href="/files/qlj4YOEF5EnxdjLcQtjw">/files/qlj4YOEF5EnxdjLcQtjw</a></td><td><a href="/pages/32YEQfRa9Y4nGyiw1qM3#create-pictor-account">/pages/32YEQfRa9Y4nGyiw1qM3#create-pictor-account</a></td></tr><tr><td>                     Step 02</td><td><a href="/files/9IKoulxBc4019hRbdPRU">/files/9IKoulxBc4019hRbdPRU</a></td><td><a href="/pages/32YEQfRa9Y4nGyiw1qM3#get-credits">/pages/32YEQfRa9Y4nGyiw1qM3#get-credits</a></td></tr><tr><td>                      Step 03</td><td><a href="/files/4rGbLvKzJpj58Tb36PUx">/files/4rGbLvKzJpj58Tb36PUx</a></td><td><a href="/pages/32YEQfRa9Y4nGyiw1qM3#create-rendering-job">/pages/32YEQfRa9Y4nGyiw1qM3#create-rendering-job</a></td></tr><tr><td>                     Step 04</td><td><a href="/files/Co9HPlhQPEqBRle8aW2o">/files/Co9HPlhQPEqBRle8aW2o</a></td><td><a href="/pages/32YEQfRa9Y4nGyiw1qM3#monitor-rendering-progress">/pages/32YEQfRa9Y4nGyiw1qM3#monitor-rendering-progress</a></td></tr><tr><td>                     Step 05</td><td><a href="/files/ynIvSboKbhWAKxyEExxK">/files/ynIvSboKbhWAKxyEExxK</a></td><td><a href="/pages/32YEQfRa9Y4nGyiw1qM3#download-results">/pages/32YEQfRa9Y4nGyiw1qM3#download-results</a></td></tr></tbody></table>

### Create Pictor Account <a href="#create-pictor-account" id="create-pictor-account"></a>

Go to [app.pictor.network](https://app.pictor.network/) and sign in with your Google account or connect to a crypto wallet (like Aptos's Petra).

<figure><img src="/files/FtPSZUvYgfjqHwezQg5R" alt=""><figcaption></figcaption></figure>

### Top up Credits <a href="#get-credits" id="get-credits"></a>

{% hint style="warning" %}
**Note**: To submit a rendering job on Pictor Network, you will need credits.

* You can buy credits by depositing crypto (USDT) or Fiat (via PayPal) directly.
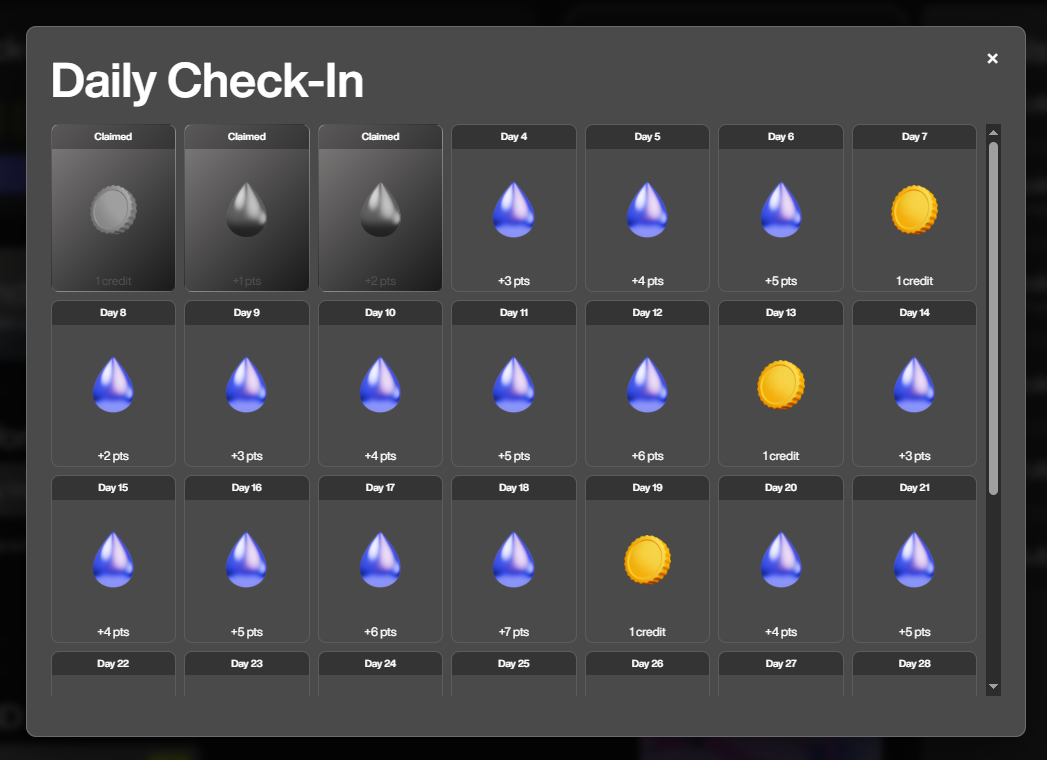
* Or, you can claim free credits by checking in daily.
  {% endhint %}

#### Top up credits

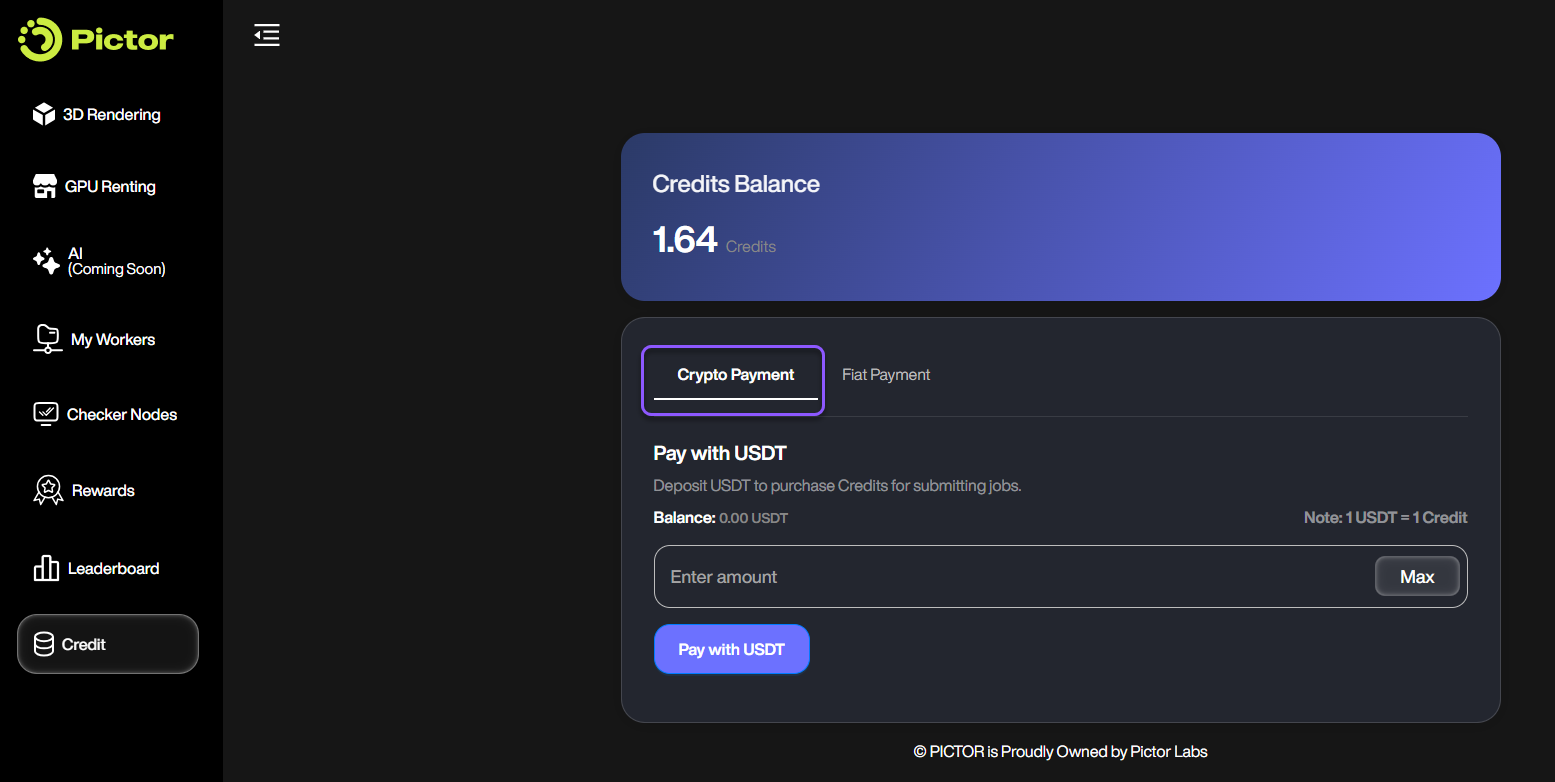
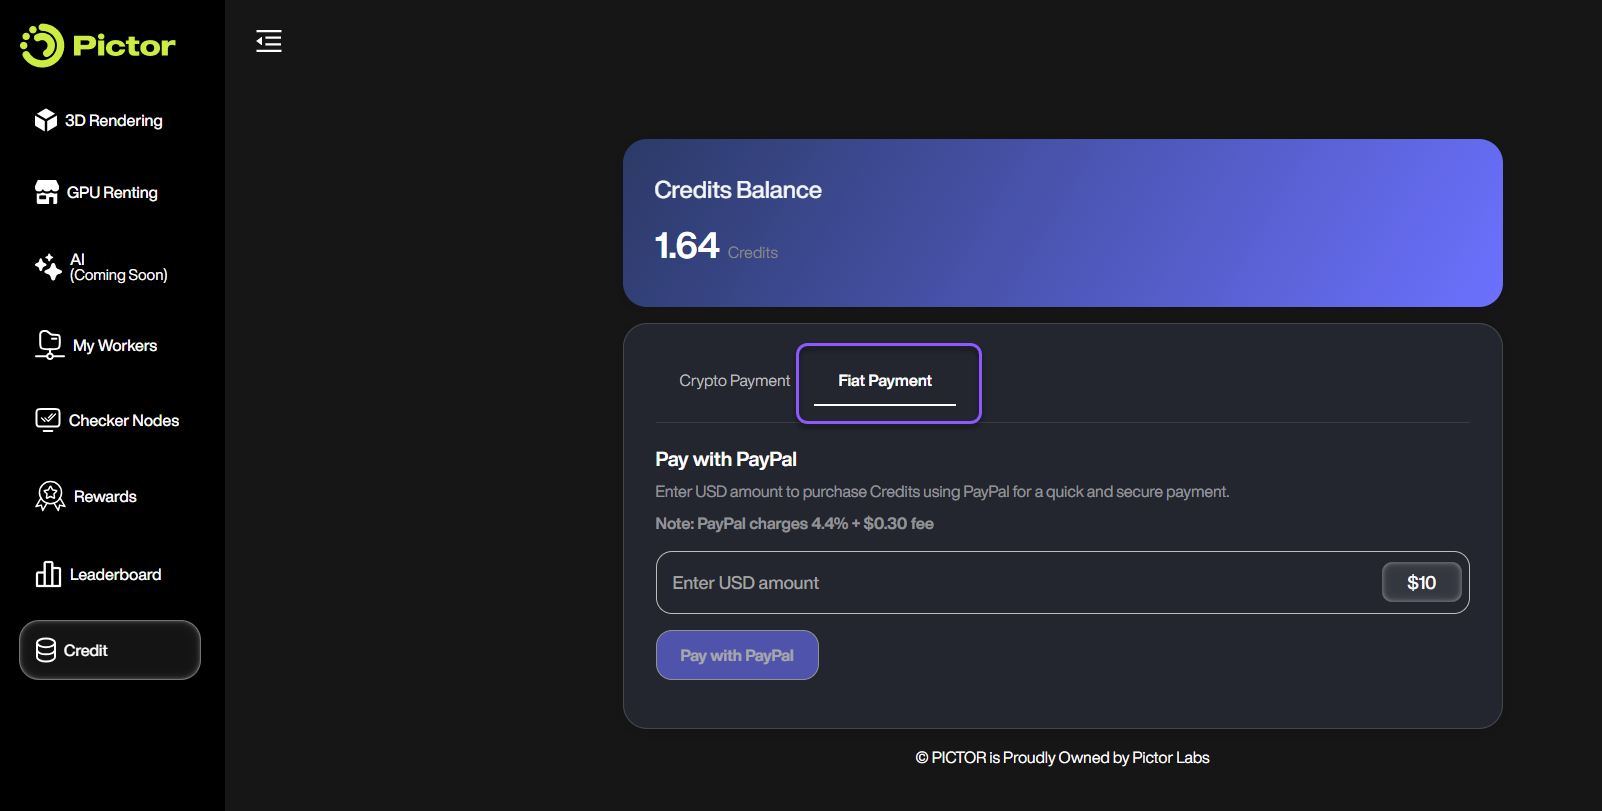
Navigate to the **Credit** section on the sidebar, and deposit crypto (currently, we support USDT) or Fiat (via PayPal) to buy credits.

<div><figure><img src="/files/1xi7Nhn5BlqwPPJ8SSZM" alt=""><figcaption><p>Crypto Top-up</p></figcaption></figure> <figure><img src="/files/JSXYOJ476HjaHl905OHA" alt=""><figcaption><p>Fiat Top-up</p></figcaption></figure></div>

#### Claim free credits

Alternatively, navigate to the **Rewards** on the sidebar >> **Daily Check-In** section and claim free credits by checking in daily.

<figure><img src="/files/o0b3GIqu1sT5VC4hD5FX" alt=""><figcaption></figcaption></figure>

{% hint style="warning" %}
**Note**:&#x20;

* 1 USDT = 1 credit
* PayPal charges **4.4%** the payment amount + **$0.3** fee
  {% endhint %}

### Create Rendering Job <a href="#create-rendering-job" id="create-rendering-job"></a>

1. Go to the **Rendering** section, click the <mark style="color:yellow;">`Start Rendering`</mark> button under the 3D Rendering feature.

<figure><img src="/files/4oSB5grK4t6hpixixhFc" alt=""><figcaption></figcaption></figure>

2. Choose the 3D software you want to use for rendering your project, and click <mark style="color:yellow;">**`Render Now`**</mark>.

<figure><img src="/files/tnrmrOkLJQ28nB1K4INV" alt=""><figcaption></figcaption></figure>

3. Choose the <mark style="color:yellow;">**`New Rendering Job`**</mark> button.&#x20;

<figure><img src="/files/1doYPKm8w366jq2Hd6IL" alt=""><figcaption></figcaption></figure>

4. **Upload** your project files

On the '*Source Selection*' page, choose the <mark style="color:yellow;">**`Upload`**</mark> button to upload your data by folder or file.

<figure><img src="/files/JwOGYss4P5ZefL8Xjv0H" alt=""><figcaption></figcaption></figure>

Then, select the uploaded render file (e.g, the ***.blend*** file), and click <mark style="color:yellow;">**`Next Step`**</mark>.

<figure><img src="/files/OdJSXr0Yt0eCt1v1R6LP" alt=""><figcaption></figcaption></figure>

5. Configure **Render Settings**

* **Information**: Add a Job name and Job comment, and choose the Software and its Version.
* **Scene Parameter Settings**: Select Render engine, Render device, Output format, Pre-test frame, and Render frame.
* **Resolution**: Choose between HD, FHD, QHD, 2K, 4K, and 8K.
* **Render Setting**: Configure Frame per node, Timeout alert, Timeout analysis, and Timeout stop.

Then, click <mark style="color:yellow;">**`Next Step`**</mark>.

<figure><img src="/files/e66l78ESBlhYkuh0NsBI" alt=""><figcaption></figcaption></figure>

6. Configure **Network Settings**

* Select the **Worker Location**.
* Select the **Hardware configuration**: GPU manufacturer, GPU model, GPU number, and RAM.
* Select **Pricing Tier**: Tier 3 – Trusted Partners, Tier 2 – Prioritize productivity, Tier 1 – Cost optimization, or NO TIER.

Then, click <mark style="color:yellow;">**`Next Steps`**</mark>.

<figure><img src="/files/hN4f380D2mXyWEE4xLPQ" alt=""><figcaption></figcaption></figure>

7. Configure **Payment Settings**

Select either **Coin or Credits** to pay for the rendering services.

And click <mark style="color:yellow;">**`Next Steps`**</mark>.

<figure><img src="/files/vwQ8tA6hqXRKlq3ns4z2" alt=""><figcaption></figcaption></figure>

8. Check the **Summary** page&#x20;

Review your job settings and configurations.&#x20;

Check the **Task Distribution** graph to see how the rendering workload is distributed across GPU farms and which farms will handle specific frame ranges.

Then, click the <mark style="color:yellow;">`Submit`</mark> button to submit your job.&#x20;

<figure><img src="/files/2orq6XRN95grB9Ed1HFa" alt=""><figcaption></figcaption></figure>

### Monitor Rendering Progress <a href="#monitor-rendering-progress" id="monitor-rendering-progress"></a>

You can track your rendering jobs in real-time, with a detailed breakdown of each frame status (enqueued, processing, or success).

<figure><img src="/files/90AREIie1pBuIatbFD4C" alt=""><figcaption></figcaption></figure>

#### Review Results <a href="#review-results" id="review-results"></a>

Based on our extensive experience in 3D rendering, we have observed that while **95% of tasks are rendered correctly**, there is a **5% chance of inaccuracies**. To address this, Pictor employs an additional layer of quality assurance. You can **review the render results** and confirm which frames are rendered *correctly* to accept and which frames are rendered *incorrectly* to request re-rendering.&#x20;

<figure><img src="/files/zmiOkkkVWQSOQP1sxy73" alt=""><figcaption></figcaption></figure>

### Download Results <a href="#download-results" id="download-results"></a>

After the rendering job is completed and you have accepted it, you can download the final results directly to your device.

<figure><img src="/files/0iQzcU89iGVJVczXWYET" alt=""><figcaption></figcaption></figure>


---

# Agent Instructions: Querying This Documentation

If you need additional information that is not directly available in this page, you can query the documentation dynamically by asking a question.

Perform an HTTP GET request on the current page URL with the `ask` query parameter:

```
GET https://docs.pictor.network/docs/participants/gpu-requesters/3d-creators/get-started.md?ask=<question>
```

The question should be specific, self-contained, and written in natural language.
The response will contain a direct answer to the question and relevant excerpts and sources from the documentation.

Use this mechanism when the answer is not explicitly present in the current page, you need clarification or additional context, or you want to retrieve related documentation sections.